Many students got there model section back today. The rest will be returned on Tuesday of next week (Monday is a PM block schedule, we will not have class).
Mr. Zartler located the missing writing, if he thought he had misplaced yours you do NOT need to email a copy.
Class today was built around developing the outline for the thesis. The outline is to be turned in on Tuesday. It should include all the notes for the thesis.
Mr. Zartler gave these notes many notes and examples including the following:
How to: It is pretty easy to create the outline for your thesis IF you have completed note cards. If you have 50-75 note cards you are in good shape.
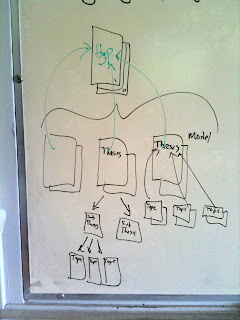
To figure out what your outline will be you will take your note cards and sort them. Begin with your “Working Hypothesis” card. Put this at the top of a large desk or table. Then begin sorting your cards into stacks. Each stack should be on one major theme, topic, or idea that will help support and explain your hypothesis (there should also be a stack off to the side for cards that you are not going to use). You will probably make 2-5 useful stacks at this stage. Each of these main stacks will be a section of your paper.
Once you are done with the first sorting you should decide what order you will present the sections you have created. Put your stacks in the order you will put them in your paper from left to right. Next you should number each and every card in every stack. Take all the cards from the first section that will be in your paper and mark each of these cards with a Roman Numeral “II;” put this number on the far left of the top line of every card in the stack. (Roman Numeral I will be for the introduction to your thesis.) Take the cards for the second section of your thesis and mark all of these cards with a Roman Numeral III. Repeat this until you have written a roman numeral in the upper left corner of EVERY note card you are going to use.
After you have numbered every card according to the section it is going to be, begin the next process of sorting your cards. Take all of the “II” stack and see if you have a card that represents the thesis for this section. If you do not then create a new card that has the thesis for the first section. Add a “A.” to the card just after the “I” (e.g. II. A.). Next, take all of the cards in the stack and sort them into related piles. Depending on the breadth or complexity of this particular section you are either creating piles that represent paragraphs in a section, or you may be creating 2-3 subsections to a section.
Once all of the cards in the section have been sorted into piles, each stack needs receive a capital letter. Cards that will be in the introduction to the section will receive the letter “A.”, cards for the first body section will be labeled I.B., the second body section I.C., etc. If your section has subsections, and not just paragraphs that the capital letters will represent the sub-sections. Cards in subsections will need to be sorted into stacks to create paragraphs. If a section has sub-sections then paragraphs will receive an arabic number after the capital letter, e.g. II.B.1, II.B.2, etc. Each time you create a stack of cards that is a sub-section, you should create a card that states the thesis of that sub-section. This card will always be the letter “A” that follows the roman numeral. Each time you create a stack of cards that represent a paragraph (generally a stack of 2-5 cards would be appropriate for a paragraph) create a Topic Sentence card for that paragraph. Keep this card on the top of each stack of cards that represents a paragraph.
Repeat the process of sorting cards within each section and subsection until you have labeled every card with a Section, (Sub-section -- if applicable), and paragraph Number or letter.
You may be wondering what all this sorting has accomplished; in short you have created your entire outline by sorting your cards!


No comments:
Post a Comment